How to Steam Clean Kitchen Cabinets Safely
Steam cleaning kitchen cabinets can damage some finishes. Check the cabinet material and finish first, test a hidden spot, use low moisture, and dry each area quickly.
On this page (9 sections)
- Is steam cleaning safe for kitchen cabinets?
- How do you check cabinet finish compatibility?
- How do you prepare cabinets before steaming?
- What is the safest steam cleaning method?
- Which steam cleaner type suits this job?
- Is a portable extractor better for some cabinet messes?
- How do you remove grease without damaging the finish?
- What should you do after steam cleaning?
- What is the safest choice for steam cleaning kitchen cabinets?
Steam cleaning kitchen cabinets can remove some grease, but heat and moisture may damage wood, veneer, laminate edges, paint, glue joints, or protective coatings. Check the cabinet finish first, test a hidden spot, use brief low-moisture passes, and dry the surface right away.
Steam is not a universal cabinet cleaner. A cabinet finish that looks sealed may still have vulnerable edges, seams, cracks, or worn areas where moisture can enter.
For general equipment choices, see our steam cleaner buying guide. For kitchen-focused options, compare the best steam cleaners for kitchens, but confirm that the tool and attachment suit the cabinet surface before use.
Is steam cleaning safe for kitchen cabinets?
Steam is safe only when the cabinet material and finish allow heat and moisture. Manufacturer care instructions take priority over any general cleaning method.
Cabinet surfaces can include painted wood, stained wood, veneer, laminate, thermofoil, and other coatings. Their resistance to steam varies, and a damaged or peeling finish needs gentler care.
Do not steam unfinished wood, cracked coatings, lifting veneer, swollen particleboard, or exposed edges. Avoid areas where water could run behind trim, into joints, around hinges, or beneath doors.
If you cannot identify the finish, start with a barely damp microfiber cloth and mild cleaning method allowed by the cabinet maker. Steam should not be the first choice when the surface care instructions are unknown.
How do you check cabinet finish compatibility?
Test the cleaning method in a hidden area before touching visible cabinet doors. Choose an inside corner, the back edge of a door, or another concealed spot with the same finish.
- Read the cabinet maker's care instructions.
- Remove loose dust and crumbs with a dry, soft cloth.
- Apply steam briefly to the test area, not continuously.
- Wipe the area dry immediately.
- Wait and inspect for clouding, tackiness, swelling, color change, raised grain, or softened coating.
Stop if the finish changes in any way. A successful test does not make every cabinet location safe, so keep steam away from seams and damaged areas.
How do you prepare cabinets before steaming?
Remove loose dirt and protect nearby surfaces before adding heat or moisture. Empty the cabinet if you need to clean its inside, and keep food, paper, and electrical items away from the work area.
Wipe dust and crumbs from the cabinet with a dry cloth. Grease mixed with loose dirt can spread when heated, making the job harder.
Place a towel beneath the work area to catch drips. Do not let water collect along the bottom rail, door edge, or countertop seam.
Remove or avoid hardware that could become hot. Keep the steam tool moving, and never direct steam into a lock, hinge, outlet, or gap.
What is the safest steam cleaning method?
Use short passes with the lowest effective steam output, then wipe and dry each section. A cloth over the tool can reduce direct contact, but it does not make an incompatible finish safe.
Work on a small area no wider than you can wipe immediately. Hold the tool near the surface only as long as needed to soften grease, then lift it away.
Use a clean microfiber cloth to collect loosened soil. Turn to a dry section of the cloth as it becomes dirty so you do not spread grease across the cabinet.
Do not park the nozzle on one spot. Avoid repeated passes over edges, joints, corners, and areas where the coating is already worn.
Can steam clean cabinet doors and drawers?
It can, but doors and drawer fronts need the same finish check as fixed cabinet boxes. Clean them in small sections and keep moisture away from the top, bottom, and side edges.
Open doors slightly so you can see where water travels. Do not flood the inside edge or allow wet cloths to sit against the board.
Dry both sides of the cleaned area. Leave doors open briefly if the cabinet maker's instructions allow it, but do not force moisture deeper into the cabinet.
Which steam cleaner type suits this job?
A small, controlled tool is easier to manage than a large floor-focused steam mop. The right choice depends on whether you need controlled steam, floor cleaning, or non-steam spot extraction.
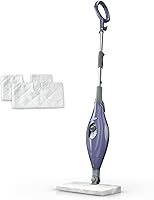
The Shark Steam Pocket Mop is designed for sealed hard floors, with a 30-second heat time, a 15.2 fl oz capacity, a rectangle mop head, and 2 washable double-sided microfiber pads. Its floor-focused form makes it a poor match for detailed cabinet work.
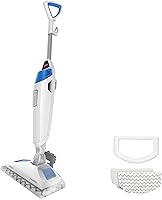
The BISSELL PowerFresh is also a floor steam cleaner for sealed hardwood, tile, ceramic, granite, and marble. It has 3 steam settings, a 30-second heat time, a 16 fl oz water tank, a 12 in cleaning path, and a 23 ft power cord, so it suits kitchen floors more than cabinet faces.
For floor cleanup after cabinet work, see the guide to the best kitchen floor steam cleaner. Keep floor tools away from cabinet faces unless the attachment and surface instructions support that use.
Is a portable extractor better for some cabinet messes?
For a liquid spill near cabinets, a portable extractor may be more suitable than adding steam to the cabinet surface. See steam cleaner versus extractor.
It uses spray, scrub, and suction rather than steam, so it can help with nearby upholstery or carpet without treating the cabinet finish.
The BISSELL Little Green Multi-Purpose Portable Carpet Cleaner has a 48 oz clean water tank and includes a Trial-Size Formula, HydroRinse Self-Cleaning Tool, and 3 in Tough Stain Tool. It is a corded portable cleaner for carpet, upholstery, and car interiors.
Do not use a carpet extractor on cabinet doors unless its instructions specifically allow that surface. Keep liquid away from wood edges, seams, and hardware.
For grease elsewhere in the kitchen, review the best steam cleaner for kitchen grease. For heavy outdoor residue, see the best steam cleaner for grills, since grill cleaning has different surface and heat concerns.
How do you remove grease without damaging the finish?
Soften grease with the least aggressive method that works for the finish. A damp microfiber cloth and an approved cleaner may be safer than steam, especially on painted, veneered, or unknown surfaces.
Start by identifying what sits on the cabinet and what the coating allows. Grease near a stove is often sticky and mixed with dust, while grease near a sink may be thinner and easier to lift.
The method that suits one area may not suit the next.
Work from clean areas toward dirtier areas. This keeps a dirty cloth from dragging soil into a clean section and creating a new film.
Change or rinse the cloth before it starts to leave streaks.
Use mild warmth from a damp cloth rather than direct heat. A warm cloth can soften grease enough for it to transfer, without putting the finish under the same stress as a steam tool.
Test the cleaner and the cloth in a hidden spot first.
Apply cleaner to the cloth, not directly to the cabinet where you can control it. This limits how much liquid reaches seams, edges, and joints.
Wipe with light pressure and let the product do the work, rather than scrubbing harder.
For thick grease, repeat gentle passes instead of increasing heat or pressure. A second pass with a clean part of the cloth often lifts more than a hard scrub on the first pass.
Patience protects the coating far better than force.
Do not mix cleaning chemicals. Some products react when combined and can harm a finish or leave residue that attracts more dirt.
Use one approved cleaner at a time and rinse as directed.
Avoid abrasive pads, sharp scrapers, strong solvents, and concentrated cleaner unless the cabinet maker specifically approves them. These tools can cut through paint or gloss and leave marks that show under kitchen light.
Even a soft pad can gloss a painted surface if used too often.
Dry the surface rather than leaving a wet film. Moisture left on edges can enter a joint or sit under trim, where it is harder to see.
Wipe each section dry right after cleaning and check corners and door edges.
Watch for early signs that the method is too strong. Clouding, tackiness, swelling, raised grain, or a color change means you should stop on that area.
A cleaner surface is not worth a softened coating or swollen edge.
Keep the finish in mind after the grease is gone. A thin, even layer of soil can often be maintained with regular wiping, so heavy cleaning becomes less frequent.
Gentle care preserves the look and helps the coating last longer.
What should you do after steam cleaning?
Dry every cabinet surface, edge, seam, and nearby hardware immediately. Open the doors and drawers if needed so trapped moisture can escape.
Check the test area and cleaned sections after they cool. Look for raised grain, dull patches, sticky paint, swollen edges, loose veneer, or a changed color.
Wash and dry reusable cloths according to their care instructions. Empty and care for the steam cleaner as directed, and do not store it with water inside unless its instructions allow that.
If a cabinet becomes swollen, cloudy, or tacky, stop cleaning that area. Contact the cabinet maker or a qualified repair professional before applying more heat, water, or chemicals.
What is the safest choice for steam cleaning kitchen cabinets?
Choose steam only when the cabinet finish is confirmed compatible and the surface passes a hidden-spot test. Use short, controlled passes, wipe immediately, and keep heat and moisture away from seams and exposed edges.
Pick the Shark or BISSELL PowerFresh for their stated sealed-hard-floor uses, not as automatic cabinet tools. Pick the BISSELL Little Green for nearby carpet or upholstery spills when spray, scrub, and suction are more suitable than steam.
The safest cabinet method is the one that removes the soil while using the least heat and moisture. If you need a different tool for outdoor cooking residue, compare steam cleaners for grills before choosing an attachment.
Frequently asked questions
Can you use a steam cleaner on kitchen cabinets?
Sometimes, but not on every cabinet finish. Check the cabinet maker's care instructions, test a hidden area, and keep heat and moisture away from seams, unfinished edges, swelling-prone boards, and damaged coatings.
Use short passes, a cloth barrier when appropriate, and dry the surface at once.
What is the safest way to steam clean kitchen cabinets?
The safest method is to confirm finish compatibility, remove loose dirt, use the lowest effective steam setting, and work in small sections. Do not hold the nozzle in one place.
Wipe away loosened soil and dry the cabinet, edges, and hardware before moving on.
Can steam damage wood kitchen cabinets?
Yes. Heat and moisture can affect wood, veneer, laminate edges, paint, glue joints, and protective coatings.
Solid wood is not automatically steam-safe.
Follow the cabinet manufacturer's instructions and stop if the finish turns cloudy, tacky, swollen, lighter, or darker.
Is steam cleaning safe for painted kitchen cabinets?
It depends on the paint and protective finish. Steam may soften, discolor, or loosen some coatings, especially around edges and joints.
Test an unseen area first, use brief contact, and choose a damp microfiber cloth instead if the finish reacts or the care instructions do not allow steam.